Inserting Shredded Doc Sections into an Outline
RFPs can be broken down into smaller components, then later re-assembled into the final RFP response document. This enables you to “shred” the RFP into sections so that each section can be worked on by other members of the team. This is especially helpful if your organization does not use SharePoint and more than one person cannot co-author the same document at the same time.
RFP response documents are first broken down into document sections, and then references to those sections are inserted into the RFP Outline Tab. Once responses for all sections are complete, you can re-assemble them into one document simply by generating the final RFP response document in the Outputs menu.
RFP response documents are first broken down into document sections, and then references to those sections are inserted into the RFP Outline Tab. Once responses for all sections are complete, you can re-assemble them into one document simply by generating the final RFP response document in the Outputs menu.
Adding Shredded Sections to Outline (Excel)
References to the document sections that were created during the process of shredding (i.e., extracting documents from) the RFP can be inserted into the outline. See Shred/section an RFP response document.
Inserting shredded sections into the RFP Outline:
Note: Before inserting any references to document sections, you must first save the Quote File (see Create Response Doc). This enables the application to copy the inserted document sections to the same location (in SharePoint, on the network drive, etc.) as the Quote File so that all files related to an RFP response can be managed in one location.
Tip: You can also insert references to other kinds of content into your RFP Response Outline via the Insert menu. See Add Content to an outline section.
Inserting shredded sections into the RFP Outline:
- In the Excel Tool, make sure that the Quote File has already been saved
- In the RFP Outline Tab, position your curser on any cell under the Content column within the Outline Grid
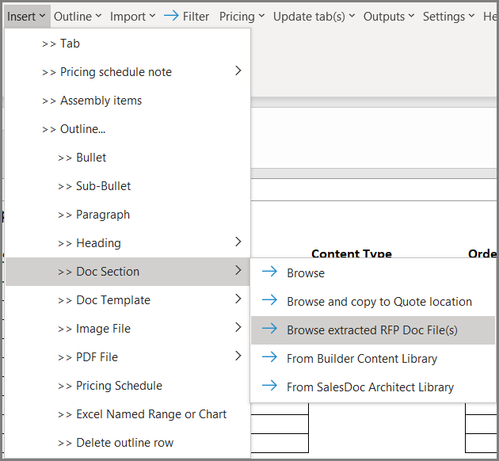
- Go to Insert >> Doc Section >> Browse extracted RFP File(s)
- You will be taken to the location where you saved the shredded (i.e., extracted) doc sections in the Word Tool. Multi-select files using your Control or Shift keys.
- References to the file(s) will be brought into the outline and there will be a check in the Include column to indicate that this section will be included in the generated final output.
Note: Before inserting any references to document sections, you must first save the Quote File (see Create Response Doc). This enables the application to copy the inserted document sections to the same location (in SharePoint, on the network drive, etc.) as the Quote File so that all files related to an RFP response can be managed in one location.
Tip: You can also insert references to other kinds of content into your RFP Response Outline via the Insert menu. See Add Content to an outline section.

