Styles in Word
Styles are a function of Word. You can use Styles to quickly apply a set of formatting choices consistently throughout your Word document. If you want formatting choices that are not available from the built-in styles and themes available in Word, you can modify an existing style or create a new style and customize it to suit your needs. You can change the formatting (such as font size, color, and text indentation) in Styles applied to titles, headings, paragraphs, lists, and so on. You can also select formatted text in your document to create a new style in the Styles gallery.
Styles are also used as the basis for automatically generating tables of contents within Word. For example, items formatted using the Heading 1, Heading 2 and Heading 3 styles will appear in a Word table of contents. Using Heading Styles also allows you to use Word’s Navigation Pane which can come in very handy.
Styles are also used as the basis for automatically generating tables of contents within Word. For example, items formatted using the Heading 1, Heading 2 and Heading 3 styles will appear in a Word table of contents. Using Heading Styles also allows you to use Word’s Navigation Pane which can come in very handy.
Styles in a Response Builder Document or Content
Styles are used in RFP Response Builder documents in several ways:
- Adding Content to the Library. When adding content to the Content Library, Styles are removed from the content so that it is inserted “cleanly” into the library. Before saving the content to the library, you can re-apply formatting and styles as you wish, in particular the Heading styles. See Formatting Library Content (Admin) for more information on how to cleanly build Library content.
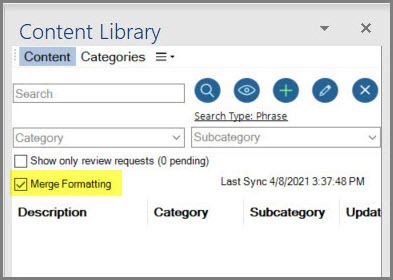
- Inserting Content into a document. Merge Formatting, which appears in the Builder Content Library Panel (see illustration to the right), can be toggled on/off when inserting content from the Library into a document. It controls whether inserted content will be formatted like it is at the point of insertion or formatted to match the Styles within the document into which the content is being inserted.
- Doc Templates. Doc Templates are all about Styles. Setting up your Styles in Document Templates will set the formatting, spacing, etc. for all documents that are using that Document Template. The Doc Template is in effect the “receptacle” into which all other content is inserted in final outputs, with the inserted content inheriting the Style formatting as defined in the Doc Template.

Applying Styles in Word
The styles covered in this guide are located in the Styles gallery, a visual menu located on Word’s Home tab. To apply a style, simply select the text you want to format and then click the style you want in the Styles gallery.

Modify an existing style
You can modify an existing style in the Styles gallery in two ways:
Modify a Style by updating it to match formatting in your document. If you have text in your document that already has a style applied, you can change the formatting of that text and update the style in the Styles gallery.
Note: All text with the style that you changed will automatically change to match the style that you updated.
- Modify a style by updating it to match formatting in your document
- Modify a style manually in the Modify Style dialog box
Modify a Style by updating it to match formatting in your document. If you have text in your document that already has a style applied, you can change the formatting of that text and update the style in the Styles gallery.
- Select text in your document that has the style applied, such as Heading 1. When you select text that has a style applied, that style is highlighted in the Styles gallery.
- Format the selected text with the new attributes that you want. For example, you might want to change the point size for the Heading 1 style from 16 points to 14 points.
- On the Home tab, in the Styles group, right-click the style that you want to change, and then click Update [Style Name] to Match Selection.
Note: All text with the style that you changed will automatically change to match the style that you updated.

Modify a style manually in the Modify Style dialog box
You can modify a style directly in the Styles gallery, without using the text in your document.
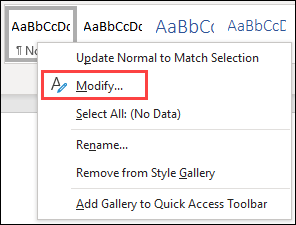
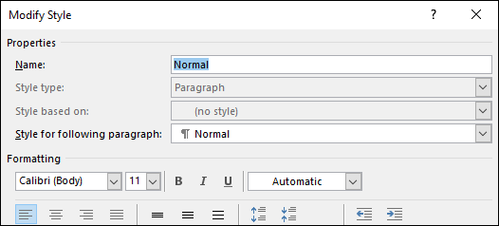
- On the Home tab, right-click any style in the Styles gallery and click Modify.
- In the Formatting section, make any formatting changes you want, such as font style, size, or color, alignment, line spacing, or indentation.
- Choose whether the style change applies to the current document or to all future documents.


Create a new style based on document formatting
You can select formatted text in your document to create a new style that you can add to the Styles gallery.
Note: If you want your new style to appear in all new Word documents, right-click it in the Styles gallery, click Modify, and then select New documents based on this template at the bottom of the dialog box.
Source: Microsoft Support
More Information:
- Right-click the text on which you want to base a new style.
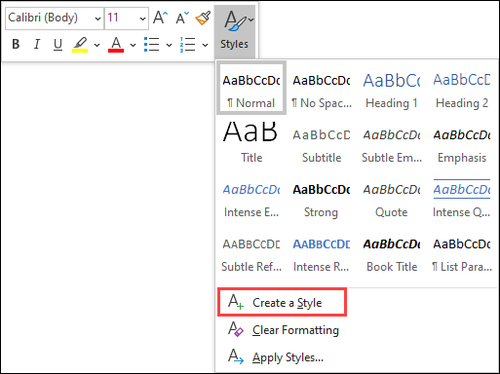
- In the mini toolbar that appears, click Styles, and then click Create a Style.
- In the Create New Style from Formatting dialog box, give your style a name and click OK.
- Your new style will now appear in the Styles gallery.
Note: If you want your new style to appear in all new Word documents, right-click it in the Styles gallery, click Modify, and then select New documents based on this template at the bottom of the dialog box.
Source: Microsoft Support
More Information:

